Installation
This document provides a general overview and demonstration of the installation process for the various EHRATM components. Deeper technical details are available in the nwpinstall documentation.
Here, we focus primarily on the installation of WPS/WRF and Flexpart WRF in a way that will be compatible with the EHRATM system components. Then, we cover the configuration of a couple of “globals” files within the repository source code.
The examples here show the distributions being installed in /dvlscratch/ATM/morton/EHRATM-develop-freeze-v1.0/, and the develop-freeze-v1.0<datetimestamp> tag in the high-res-atm gitlab repository, has been configured to use these distributions.
Overview
The nwp_install component is a scripted environment for a reproducible installation of specified versions of WPS/WRF and Flexpart WRF. The scripts will install a specified version the same way, every time, providing a standard installation that users can count on. Originally built in support of the EHRATM project, this component stands indepdendent and can be used for a variety of standalone WPS/WRF and Flexpart WRF activities.
The overall vision of this component, as illustrated below, is that multiple versions of WPS/WRF and Flexpart WRF may be installed in a static environment, and users have the flexibility to use their version of choice, all within their own user space, and they may work with multiple instances simultaneously.
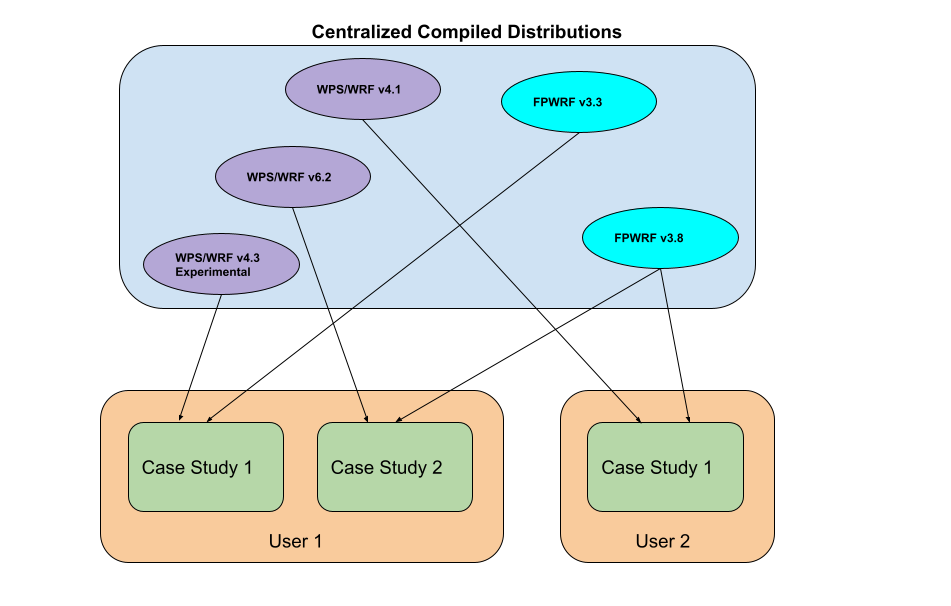
The distributions created through these install processes provide a static collection of fully-compiled and installed WPS, WRF and Flexpart WRF environments (at a later date, it may contain more). Through their use (typically through copying and/or linking) we may be confident that we are using fully-tested, operational environments for a wide variety of applications. Users or developers who want different distributions can simply install them in a similar manner, storing them in different locations. With this approach, we can have a collection of stable distributions of different versions, and experimental distributions.
Again, more detail is provided in the nwpinstall documentation.
The following demonstrations were performed in /dvlscratch/ATM/morton/EHRATM-develop-freeze-v1.0/ and these are the distributions utilized by the develop-freeze-v1.0-<datetime> tag of the high-res-atm repository.
Installation of WPS/WRF
We start by creating the directory for WRF distributions
$ mkdir WRFDistributions
GEOG_DATA
The WRF simulations are initialised with a lot of static, gridded data - things like topography, land use, leaf area index, etc. This data is available in various resolutions from coarse to fine, and, when fully installed, takes up 30-50+ GBytes of disc space. In order to maintain a versatile WRF modeling environment, it makes sense to make all of this available on the local computing system. It doesn’t make sense to try to store it within the nwpinstall component, nor does it make sense to download and install it for each new WRF distribution.
For the most part, this data is identical from one WRF version to another, though sometimes newer versions may use some newly-available datasets. So, it’s generally necessary to install this geog data one time, and then specifying its location when installing a new WRF distribution,
The geog data is available at the WRF site, at https://www2.mmm.ucar.edu/wrf/users/download/get_sources_wps_geog.html. It can be confusing to understand what needs to be downloaded, so the following provides a working example of one-time installation of the datasets needed (so far) for the WRF distributions installed in this component
$ cd WRFDistributions
$ mkdir geog

$ wget http://www2.mmm.ucar.edu/wrf/src/wps_files/geog_complete.tar.gz

$ tar xzvf geog_complete.tar.gz --strip-components=1 -C geog

$ du -csk geog
51336536        geog
51336536        total
Once you’re sure that installation was correct (you might wait until you’ve had a successful test of a WRF distribution) it’s safe to remove the downloaded tar file.
The newer WPS/WRF versions need a couple of extra datasets, installed as follows
$ wget https://www2.mmm.ucar.edu/wrf/src/wps_files/albedo_modis.tar.bz2
$ wget https://www2.mmm.ucar.edu/wrf/src/wps_files/maxsnowalb_modis.tar.bz2

$ cd geog

$ tar xjvf ../albedo_modis.tar.bz2
$ tar xjvf ../maxsnowalb_modis.tar.bz2
WPS/WRF
Within the repository nwpsintall/install-wrf directory are a set of subdirectories for each of the supported distributions. A new distribution can be made by creating a similar directory (sometimes just copying another one will suffice) and editing as needed. In this case, we will use nwpsinstall/install-wrf/wrfv4.3_2022-04-25/. Before doing anything, we need to set some environment variables, sourcing setup_install_env.sh. The settings are standard for CTBTO-like systems and should not need any modifying by you
#!/bin/bash

# Set of system-specific (mostly) environment variables used by the
# installation routines to compile, setup and test a WRF distribution

################################################################
#   These have been tested in the CTBTO-like CentOS 7 VM
#   and are the same on devlan
################################################################
export MPIF90=/usr/lib64/openmpi/bin/mpif90
export MPICC=/usr/lib64/openmpi/bin/mpicc

# This is needed for running post-install test cases
export MPIRUN=/usr/lib64/openmpi/bin/mpirun

# Note that the netcdf.mod file in CentOS 7 seems not to be in same place
# as typical netcdf includes
export NETCDF=/usr
export NETCDF_MOD_INC=/usr/lib64/gfortran/modules
export NETCDF_classic=1

export JASPERLIB=/usr/lib64
export JASPERINC=/usr/include

# Needed for some of the WPS utilities (e.g. plotgrids.exe)
export NCARG_ROOT=/usr/lib64/ncarg

So, before running the installation script, the environment can be setup as follows, within the desired distribution directory.

Note that the system Python 2.7.5 is sufficient for all this.  No need to worry about Conda environments yet
$ . setup_install_env.sh
Once the geog files and the system environment variables have been set up correctly, it should be possible to run the installation program to build and install the distribution in (for example) WRFDistributions/ as follows
$ ./wrfinstall.py --baseinstalldir /dvlscratch/ATM/morton/EHRATM-develop-freeze-v1.0/WRFDistributions/WRFV4.3 --geogdatadir /dvlscratch/ATM/morton/EHRATM-develop-freeze-v1.0/WRFDistributions/geog
2023-11-25 18:59:43,761  - INFO - wrfinstall.py:main:56 --> Starting install...
.
.
.
2023-11-25 19:11:57,247  - INFO - wrfinstall.py:nam_nodak_test:753 --> Apparent successful completion of test...
This script retrieves the source codes, configures, builds, and performs simple tests of functionality for WRF, then WPS. It doesn’t test for correct answers, but just tests that the basic components run.
$ ls -lF /dvlscratch/ATM/morton/EHRATM-develop-freeze-v1.0/WRFDistributions/WRFV4.3
total 32
lrwxrwxrwx.  1 morton consult    71 Nov 25 18:59 GEOG_DATA -> /dvlscratch/ATM/morton/EHRATM-develop-freeze-v1.0/WRFDistributions/geog/
drwxr-xr-x.  8 morton consult  4096 Nov 25 19:10 WPS/
drwxr-xr-x. 22 morton consult  4096 Nov 25 19:00 WRF/
-rwxr-xr-x.  1 morton consult 17957 Nov 25 19:10 wrfusersetup.py*
The entire installation process on dls011 took approximately 12 minutes. Within the WRFV4.3 directory is a fully-functional WPS/WRF environment. The wrfusersetup.py program was created in the installation process and serves as a tool within the EHRATM system to create standalone WPS/WRF run directories. You could use this yourself at this point - more details are in the nwpinstall documentation.
Installation of Flexpart WRF
In a similar way we can install Flexpart WRF in /dvlscratch/ATM/morton/EHRATM-develop-freeze-v1.0/
$ mkdir FlexWRFDistributions
So, in the nwpinstall/install-flxwrf/flxwrfv3.3_2023-11-25/ directory
Again, just using system Python 2.7.5 default
$ . setup_install_env.sh
$ ./flxwrfinstall.py --baseinstalldir /dvlscratch/ATM/morton/EHRATM-develop-freeze-v1.0/FlexWRFDistributions/flexwrfv3.3
2023-11-25 19:48:27,148  - INFO - flxwrfinstall.py:main:75 --> Starting install...
.
.
.
2023-11-25 19:51:35,436  - INFO - flxwrfinstall.py:sicily_2hr_test:816 --> All expected output files are present
2023-11-25 19:51:35,436  - INFO - flxwrfinstall.py:sicily_2hr_test:818 --> Apparent successful completion of sicily_2hr_test...
and upon completion we can view the new distribution, noting that it has also install flexpart2ctbt in the srm/ directory, and has created the flxwrfusersetup.py program that allows us to create standalone run environments, like wrfusersetup.py.
$ ls -lF /dvlscratch/ATM/morton/EHRATM-develop-freeze-v1.0/FlexWRFDistributions/flexwrfv3.3
total 44
drwxr-xr-x. 4 morton consult 28672 Nov 25 19:49 flexwrf_code/
-rwxr-xr-x. 1 morton consult  6003 Nov 25 19:49 flxwrfusersetup.py*
drwxr-xr-x. 3 morton consult  4096 Nov 25 19:48 srm/
Configuration of EHRATM Defaults
At this point, we have a complete system for running WPS/WRF and Flexpart WRF, and it’s useful to consider that this is all the knowledgeable user really needs. The EHRATM system is merely a set of tools to allow us to use it all more efficiently for a wide variety of scenarios.
The high-res-atm repository, when accessed through the tag develop-freeze-v1.0-<datetime> should be set up to default values that will allow a user to immediately begin operations. However, several of the values should be discussed, particularly for those who might want to install things in different locations.
There are three files within the high-res-atm system that define some global (or semi-global) values. I would have liked to have had time to make this cleaner, perhaps having these files up higher in the directory tree, or having a simple text file for setting the files, but this is how it is for now.
In packages/nwpservice/src/nwpservice/defaults.py we have a single definition for setting a log level. Most users will have no interest in this.
packages/ehratm/src/ehratm/syspaths.py is the most important one. What’s in there now should work for these demonstrations, but I am the only one who has tested any of this so far. You should look in the devlan section of the file, and note the following definitions
REPOSITORY_ROOTDIR = '/dvlscratch/ATM/morton/git/high-res-atm'
DISTRIBUTIONS_ROOTDIR = '/dvlscratch/ATM/morton/EHRATM-develop-freeze-v1.0'
These are the locations of the gitlab repository (set at the develop-freeze-v1.0-<datetime> tag) and the WPS/WRF and Flexpart WRF distributions discussed above. Both of these are read-only filesystems, so it should be safe for a user to stick with these. Obviously, new installations will require a change in here.
In the same syspaths.py we have
self._WORKING_SCRATCH_ROOTDIR = '/tmp'
self._WORKFLOW_ROOTDIR = '/tmp'
WORKFLOW_ROOTDIR is where all of the simulations take place, and where all of the input/output files for a workflow are located, so it tends to take up a lot of space. The /tmp directory is typically not a good place for this, but it is known to be writable by everybody, so it is the default. As demonstrated in the New User HowTo document, there is an entry in the wfnamelist, workflow_rootdir that allows one to override the default to something within their own user directory.
WORKING_SCRATCH_ROOTDIR is little-used, so the /tmp default location should not be a problem. But, power users who create their own installations may want to go ahead and set it to something in their own filesystems.
Finally, in ehratm/src/ehratm/defaults.py we have a set of global constants, many of which can be overridden elsewhere. The ones that might be most important include WRF_SPINUP_HOURS, which can be overriden in the wfnamelist, and MAX_MPI_TASKS. This is currently set to 16 in order to keep a user from blindly using too many cores on a devlan system. There is no way to override this, so someone interested in more MPI tasks would need to clone their own copy of the repository, set it to the develop-freeze-v1.0-<datetime> tag, and then modify this value.
Summary
That’s it. Although a lot was said above, any new installation is a matter of
Cloning the repository and setting to the
develop-freeze-v1.0-<datetime>tagInstalling the distributions as described above
Configuring several of the EHRATM default values as described above.
After that, one could go to the New User HowTo and try some workflows.