Overview
Introduction
The nwp_install component is a scripted environment for a reproducible installation of specified versions of WPS/WRF and Flexpart WRF. The scripts will install a specified version the same way, every time, providing a standard installation that users can count on. Originally built in support of the EHRATM project, this component stands indepdendent and can be used for a variety of standalone WPS/WRF and Flexpart WRF activities.
The overall vision of this component, as illustrated below, is that multiple versions of WPS/WRF and Flexpart WRF may be installed in a static environment, and users have the flexibility to use their version of choice, all within their own user space, and they may work with multiple instances simultaneously.
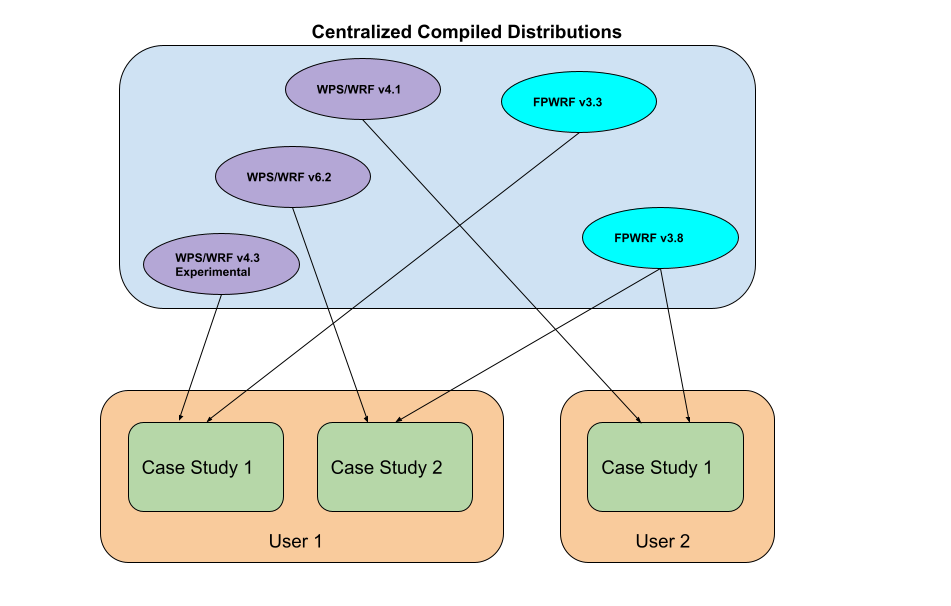
The distributions created through these install processes provide a static collection of fully-compiled and installed WPS, WRF and Flexpart WRF environments (at a later date, it may contain more). Through their use (typically through copying and/or linking) we may be confident that we are using fully-tested, operational environments for a wide variety of applications. Users or developers who want different distributions can simply install them in a similar manner, storing them in different locations. With this approach, we can have a collection of stable distributions of different versions, and experimental distributions.
Demonstration of the WPS/WRF Install
The installed distribution will sit untouched and a user run script will be created for each distribution. With the user run script, a user can create a “virtual” distribution within their own local filesystem, using it for a desired simulation. The following explains how a user might interact with this user run script for a specified WPS/WRF distribution to create their own custom simulation. The explanations provided below are meant as a demonstration and the reader should not try to absorb the details. Additional detail is introduced later in this documentation.
Use of the wrfusersetup.py program is relatively simple - the user invokes it with a single argument of the name of the directory (and an optional path to it) that should be used for the simulation. The directory name provided must be writable by the user, of course, and if it already exists then it will not proceed. This policy is implemented to ensure that users don’t accidentally overwrite a simulation directory that might have a lot of important data in it.
Creation of a WPS/WRF run environment for custom simulation
In these examples, I’m assuming a WPS/WRF distribution has been created (using guidance provided later in this document) in /dvlscratch/ATM/morton/WRFDistributions/WRFV4.3/ and that I’m starting with /dvlscratch/ATM/morton/ as my cwd. First, I run wrfusersetup.py with no argument, getting the usage message, then I run it with the MyFirstTest argument, indicating that I want a local WPS/WRF distribution to be created in that directory:
$ pwd
/dvlscratch/ATM/morton

$ WRFDistributions/WRFV4.3/wrfusersetup.py


Usage: ./wrfusersetup.py <DomainName>

                 or

        /path/to/wrfusersetup.py /path/to/<DomainName>

     * Creates dir <DomainName> in specified directory


$ WRFDistributions/WRFV4.3/wrfusersetup.py MyFirstTest
WRF src distribution directory: /dvlscratch/ATM/morton/WRFDistributions/WRFV4.3
geog data dir: /dvlscratch/ATM/morton/WRFDistributions/WRFV4.3/GEOG_DATA
Creating domain: MyFirstTest in directory: /dvlscratch/ATM/morton
Setting up WPS run dir: /dvlscratch/ATM/morton/MyFirstTest/WPS
Done creating geogrid items
Done creating metgrid items
Done creating ungrib items
Done creating util items
Setting up WRF run dir: /dvlscratch/ATM/morton/MyFirstTest/WRF
WRF run dir set up completed
Once complete, I can take a quick look in this new directory:
$ tree -L 1 MyFirstTest
MyFirstTest
├── GEOG_DATA -> /dvlscratch/ATM/morton/WRFDistributions/WRFV4.3/GEOG_DATA
├── WPS
└── WRF

3 directories, 0 files

$ tree -L 1 MyFirstTest/WPS
MyFirstTest/WPS
├── geogrid
├── geogrid.exe -> /dvlscratch/ATM/morton/WRFDistributions/WRFV4.3/WPS/geogrid/src/geogrid.exe
├── link_grib.csh
├── metgrid
├── metgrid.exe -> /dvlscratch/ATM/morton/WRFDistributions/WRFV4.3/WPS/metgrid/src/metgrid.exe
├── namelist.wps
.
.
.
├── ungrib.exe -> /dvlscratch/ATM/morton/WRFDistributions/WRFV4.3/WPS/ungrib/src/ungrib.exe
└── util

4 directories, 10 files


$ tree -L 1 MyFirstTest/WRF
MyFirstTest/WRF
├── aerosol.formatted -> /dvlscratch/ATM/morton/WRFDistributions/WRFV4.3/WRF/run/aerosol.formatted
├── aerosol_lat.formatted -> /dvlscratch/ATM/morton/WRFDistributions/WRFV4.3/WRF/run/aerosol_lat.formatted
.
.
.
├── MPTABLE.TBL -> /dvlscratch/ATM/morton/WRFDistributions/WRFV4.3/WRF/run/MPTABLE.TBL
├── namelist.input
├── ndown.exe -> /dvlscratch/ATM/morton/WRFDistributions/WRFV4.3/WRF/main/ndown.exe
├── ozone.formatted -> /dvlscratch/ATM/morton/WRFDistributions/WRFV4.3/WRF/run/ozone.formatted
.
.
.
├── wind-turbine-1.tbl -> /dvlscratch/ATM/morton/WRFDistributions/WRFV4.3/WRF/run/wind-turbine-1.tbl
└── wrf.exe -> /dvlscratch/ATM/morton/WRFDistributions/WRFV4.3/WRF/main/wrf.exe

0 directories, 81 files
The WPS and WRF directories are fully functional, ready for use to set up and run a simulation. Note that namelist.wps and namelist.input are copies of files, not linked to the original execution. Later in this document, I demonstrate how this new run directory can be used to manually set up and execute a simple WRF simulation using GFS files from CTBTO’s filesystem.
An important feature of this procedure is that a user can set up a number of these “virtual” environments, for different purposes, and even run them simultaneously. These virtual environments may be created from any of the installed distributions, including those based on standard and experimental versions of the models, providing the user with a great deal of flexibility to run different models, and to serve as a foundation for the EHRATM pipeline environment.
Demonstration of the Flexpart WRF Install
The installed distribution will sit untouched and a user run script will be created for each distribution. With the user run script, a user can create a “virtual” distribution within their own local filesystem, using it for a desired simulation. The following explains how a user might interact with this user run script for a specified Flexpart WRF distribution to create their own custom simulation. The explanations provided below are meant as a demonstration and the reader should not try to absorb the details. Additional detail is introduced later in this documentation.
Use of the flxwrfusersetup.py program is relatively simple - the user invokes it with a single argument of the name of the directory (and an optional path to it) that should be used for the simulation. The directory name provided must be writable by the user, of course, and if it already exists then it will not proceed. This policy is implemented to ensure that users don’t accidentally overwrite a simulation directory that might have a lot of important data in it.
Creation of a Flexpart WRF run environment for custom simulation
In these examples, I’m assuming a Flexpart WRF distribution has been created (using guidance provided later in this document) in /dvlscratch/ATM/morton/FlexWRFDistributions/FlexWRFV3.3/ and that I’m starting with /dvlscratch/ATM/morton/ as my cwd. First, I run flxwrfusersetup.py with no argument, getting the usage message, then I run it with the MyFirstTest argument, indicating that I want a local Flexpart WRF distribution to be created in that directory:
$ pwd
/dvlscratch/ATM/morton

$ FlexWRFDistributions/FlexWRFv3.3/flxwrfusersetup.py


Usage: ./flxwrfusersetup.py <DomainName>

                 or

        /path/to/flxwrfusersetup.py /path/to/<DomainName>

     * Creates dir <DomainName> in specified directory

$ FlexWRFDistributions/FlexWRFv3.3/flxwrfusersetup.py MyFirstFlexWRFTest
FLXWRF src distribution directory: /dvlscratch/ATM/morton/FlexWRFDistributions/FlexWRFv3.3/flexwrf_code
Creating domain: MyFirstFlexWRFTest
Setting up FLEXWRF run dir: MyFirstFlexWRFTest/flexwrf_rundir
Once complete, I can take a quick look in this new directory
$ tree -L 2 MyFirstFlexWRFTest
MyFirstFlexWRFTest
└── flexwrf_rundir
    ├── AVAILABLE2.sample
    ├── AVAILABLE3.sample
    ├── flexwrf.input.backward1.sample
    ├── flexwrf.input.backward2.sample
    ├── flexwrf.input.forward1.sample
    ├── flexwrf.input.forward2.sample
    ├── flexwrf_mpi -> /dvlscratch/ATM/morton/FlexWRFDistributions/FlexWRFv3.3/flexwrf_code/flexwrf_mpi
    ├── flexwrf_omp -> /dvlscratch/ATM/morton/FlexWRFDistributions/FlexWRFv3.3/flexwrf_code/flexwrf_omp
    ├── flexwrf_serial -> /dvlscratch/ATM/morton/FlexWRFDistributions/FlexWRFv3.3/flexwrf_code/flexwrf_serial
    ├── IGBP_int1.dat -> /dvlscratch/ATM/morton/FlexWRFDistributions/FlexWRFv3.3/flexwrf_code/data/IGBP_int1.dat
    ├── OH_7lev_agl.dat -> /dvlscratch/ATM/morton/FlexWRFDistributions/FlexWRFv3.3/flexwrf_code/data/OH_7lev_agl.dat
    ├── README_FIRST.txt.sample
    ├── surfdata.t -> /dvlscratch/ATM/morton/FlexWRFDistributions/FlexWRFv3.3/flexwrf_code/data/surfdata.t
    └── surfdepo.t -> /dvlscratch/ATM/morton/FlexWRFDistributions/FlexWRFv3.3/flexwrf_code/data/surfdepo.t

1 directory, 14 files
The Flexpart WRF directory is fully functional, ready for use to set up and run a simulation. Note that flexwrf.input* are copies of files, not linked to the original execution. In the following, I demonstrate how this new run directory can be used to manually set up and execute a simple Flexpart WRF simulation using existing wrfout* files. My assumption is that the reader is experienced in running Flexpart WRF simulations, so I don’t bother to explain the steps in any detail. Later in this document, I demonstrate how this new run directory can be used to manually set up and execute a simple Flexpart WRF simulation using wrfout files from a previously executed WRF simulation.
An important feature of this procedure is that a user can set up a number of these “virtual” environments, for different purposes, and even run them simultaneously. These virtual environments may be created from any of the installed distributions, including those based on standard and experimental versions of the models, providing the user with a great deal of flexibility to run different models, and to serve as a foundation for the EHRATM pipeline environment.
Summary
This page has provided an overview of the purpose and potential uses of the nwp_install system. The rest of the underlying documentation focuses on the actual installation of the NWP systems, as well as demonstrations of their manual usage for a complete modeling workflow. Although the details, and even the existence, of the nwp_install component is mostly hidden from the user, there may be times when somebody wants to introduce new versions of WPS/WRF or Flexpart WRF distributions, and test them directly.